Win32 Tree-View Control
Download: TreeView.zip
Tree-View control is a window that can list multiple items in a hierarchical view, such as directory list in Windows explorer. This article describes how to use Tree-View control using only Windows API, without using MFC nor .NET framework.
Create TreeView
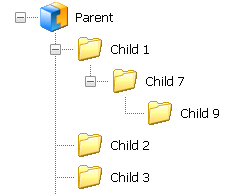
TreeView control
TreeView is required to load the Common Control library, comctl32.dll, before creating a TreeView control, in order to register TreeView window class, ICC_TREEVIEW_CLASSES. To load comctl32.dll, put the following code at the beginning of main() or WinMain(), right before creating any window.
#include <commctrl.h>                       // common controls
...
// register TreeView from comctl32.dll before creating windows
INITCOMMONCONTROLSEX commonCtrls;
commonCtrls.dwSize = sizeof(commonCtrls);
commonCtrls.dwICC = ICC_TREEVIEW_CLASSES;   // TreeView class name
InitCommonControlsEx(&commonCtrls);
TreeView can be created in run time by using CreateWindow() or CreateWndowEx() with the pre-defined window class name, WC_TREEVIEW, but is commonly created using the resource script editor of MS VisualStudio IDE. User can modify the size and position of a TreeView and its properties (styles) with a graphical user interfaces, and then these attributes are written into the resource script file (*.rc). The styles of a TreeView change the appearance of the TreeView. All possible styles are listed here.
Each item in a TreeView can have 4 images; selected, unselected, overlay and additional state image. By default, TreeView does not display images associated with items. You have to create an ImageList control with ImageList_Create() and then, link it to the TreeView control with TVM_SETIMAGELIST message in order to display item images. If the ImageList does not need anymore, delete it with ImageList_Destroy().
ImageList_Create() requires 5 parameters: image width, image height, flags, the initial number of images and grow size. If image is transparent, use ILC_MASK flag. The last parameter, grow size is the number of images when ImageList needs to grow for new images. The following code shows adding 2 icons for selected and unselected image into a ImageList, then, link it to a TreeView.
// create ImageList control first
HIMAGELIST imageList = ::ImageList_Create(IMAGE_WIDTH,
                                          IMAGE_HEIGHT,
                                          ILC_COLORDDB | ILC_MASK,
                                          IMAGE_COUNT,
                                          GROW_SIZE);

// load icons and add them to ImageList
// PARAMS: hInstance, filename, type, width, height, flag
HICON icon;
icon = (HICON)::LoadImage(::GetModuleHandle(0),
                          MAKEINTRESOURCE(IDI_FOLDERCLOSED),
                          IMAGE_ICON, IMAGE_WIDTH, IMAGE_HEIGHT,
                          LR_DEFAULTCOLOR);
::ImageList_AddIcon(imageList, icon);

icon = (HICON)::LoadImage(::GetModuleHandle(0),
                          MAKEINTRESOURCE(IDI_FOLDEROPEN),
                          IMAGE_ICON, IMAGE_WIDTH, IMAGE_HEIGHT,
                          LR_DEFAULTCOLOR);
::ImageList_AddIcon(imageList, icon);

// make sure all icons are in the ImageList
if(::ImageList_GetImageCount(imageList) == IMAGE_COUNT)
{
    // hook the ImageList to the TreeView
    ::SendMessage(tvHandle, TVM_SETIMAGELIST,
                  (WPARAM)TVSIL_NORMAL, (LPARAM)imageList);
}
Add and Remove Item
To add a new item into a TreeView control, use TVM_INSERTITEM message with TVINSERTSTRUCT struct variable. You need to populate the information of the item to the TVINSERTSTRUCT variable, such as, who is the parent item, the label of the item and associated images. I added a helper class for TreeView control in Controls.h in the example file, TreeView.zip. TreeView::insertItem() can be used to add an item to a TreeView.
HTREEITEM insertItem(const wchar_t* str, HTREEITEM parent, HTREEITEM insertAfter,
                     int imageIndex, int selectedImageIndex)
{
    // build TVINSERTSTRUCT
    TVINSERTSTRUCT insertStruct;
    insertStruct.hParent = parent;
    insertStruct.hInsertAfter = insertAfter;
    insertStruct.item.mask = TVIF_TEXT | TVIF_IMAGE | TVIF_SELECTEDIMAGE;
    insertStruct.item.pszText = (LPWSTR)str;
    insertStruct.item.cchTextMax = sizeof(str)/sizeof(str[0]);
    insertStruct.item.iImage = imageIndex;
    insertStruct.item.iSelectedImage = selectedImageIndex;

    // insert the item
    return (HTREEITEM)::SendMessage(handle, TVM_INSERTITEM,
                                    0, (LPARAM)&insertStruct);
}
To delete an existing item, use TVM_DELETEITEM message. If a parent item is deleted, all the children of it are also deleted. Therefore, use TVI_ROOT or NULL parameter to delete all items in the TreeView.
// delete an item
HTREEITEM item;
::SendMessage(tvHandle, TVM_DELETEITEM, 0, (LPARAM)item);
Edit Item Label
The user can edit the label of am item when TVS_EDITLABELS style is set on the TreeView. TreeView control sends WM_NOTIFY message with notifications to its parent window; TVN_BEGINLABELEDIT notification when the editing has begun, and TVN_ENDLABELEDIT when the editing has done. The WM_NOTIFY event handler of the parent window should extract LPARAM to handle TreeView notification messages. You can find all TreeView notifications here.
When you receive TVN_BEGINLABELEDIT, you can prevent from editing the item label by returning non-zero value. Or, you can limit the number of characters of the label in TVN_BEGINLABELEDIT handler. When the user cancels or completes editing item label, TVN_ENDLABELEDIT is triggered. It is your responsibiltiy to update actual text in the item with TVM_SETITEM message in your TVN_ENDLABELEDIT handler. Here is an example of TVN_ENDLABELEDIT handler function.
// pass LPARAM of WM_NOTIFY here after casted to NMTVDISPINFO*
void View::endLabelEdit(NMTVDISPINFO* tvDispInfo)
{
    // NMTVDISPINFO contains TVITEM struct to identify which item is edited
    // and the new edited string in TVITEM.pszText.
    // We only need call TVM_SETITEM here.
    ::SendMessage(tvHandle, TVM_SETITEM, 0, (LPARAM)&tvDispInfo->item);
}
Drag and Drop Item
You can drag and drop an item while the left mouse button is pressed. TreeView sends WM_NOTIFY message to the parent window. LPARAM of WM_NOTIFY contains TreeView notification, TVN_BEGINDRAG when dragging is started. You have to do 3 things in TVN_BEGINDRAG handler function.
- Create a transparent dragging image using TVM_CREATEDRAGIMAGE.
- Start dragging with ImageList_BeginDrag().
- Redirect the mouse input to the parent window of TreeView.
// global variables
HTREEITEM draggedItem;
HIMAGELIST draggedImageList;
bool itemDragged;
...

// pass LPARAM of WM_NOTIFY here after casted to NMTREEVIEW*
void View::beginDrag(NMTREEVIEW* tv)
{
    // create dragging image for you using TVM_CREATEDRAGIMAGE
    // You have to delete it after drop operation, so remember it.
    draggedItem = tv->itemNew.hItem;
    draggedImageList = (HIMAGELIST)::SendMessage(tvHandle,
                                                 TVM_CREATEDRAGIMAGE,
                                                 (WPARAM)0,
                                                 (LPARAM)draggedItem);

    // start dragging operation
    // PARAMS: HIMAGELIST, imageIndex, xHotspot, yHotspot
    ::ImageList_BeginDrag(draggedImageList, 0, 0, 0);
    ::ImageList_DragEnter(tvHandle, tv->ptDrag.x, tv->ptDrag.y);

    // redirect mouse input to the parent window
    ::SetCapture(::GetParent(tvHandle));
    ::ShowCursor(false);          // hide the cursor

    itemDragged = true;
}
When you move the mouse while the left mouse button is pressed (when WM_MOUSEMOVE is triggered), you have to update 2 things. You have to move the dragging item to the current cursor position using ImageList_DragMove(), and highlight the underlying target item using TVM_SELECTITEM message with TVGN_DROPHILITE, so you can see where to drop the dragged item.
void View::dragItem(HWND parentHandle, int x, int y)
{
    // convert the dialog coords to control coords
    POINT point;
    point.x = (SHORT)x;
    point.y = (SHORT)y;
    ::ClientToScreen(parentHandle, &point);
    ::ScreenToClient(tvHandle, &point);

    // drag the item to the current the cursor position
    ::ImageList_DragMove(point.x, point.y);

    // hide the dragged image, so the background can be refreshed
    ::ImageList_DragShowNolock(false);

    // find out if the pointer is on an item
    // If so, highlight the item as a drop target.
    TVHITTESTINFO hitTestInfo;
    hitTestInfo.pt.x = point.x;
    hitTestInfo.pt.y = point.y;
    HTREEITEM targetItem = (HTREEITEM)::SendMessage(tvHandle,
                                                    TVM_HITTEST,
                                                    (WPARAM)0,
                                                    (LPARAM)hitTestInfo);
    if(targetItem)
    {
        // highlight the target of drag-and-drop operation
        ::SendMessage(tvHandle, TVM_SELECTITEM,
                      (WPARAM)TVGN_DROPHILITE, (LPARAM)targetItem);
    }

    // show the dragged image
    ::ImageList_DragShowNolock(true);
}
When you release the mouse button (when WM_LBUTTONUP is triggered), you need to drop the dragged item onto the target item to complete the drag-and-drop operation using ImageList_EndDrag(). To move the item to the target item, you have to make a copy of the dragged item first, and, insert the clone under the target item. Then, you can delete the original dragged item safely. (See Add and Remove item section above.) Note that the dragged item may have many child items with multiple sub-levels. If the item has children, you also move all the children. This is a little difficult task, because you have to traverse all sub-tree to find all child items. Take a look View::moveTreeViewItem() in the example for more details.
void View::dropItem()
{
    // get the target item
    HTREEITEM targetItem = (HTREEITEM)::SendMessage(tvHandle,
                                                    TVM_GETNEXTITEM,
                                                    (WPARAM)TVGN_DROPHILITE,
                                                    (LPARAM)0);

    // make a copy of the dragged item and insert the clone under
    // the target item, then, delete the original dragged item
    // Note that the dragged item may have children. In this case,
    // you have to move (copy and delete) for every child items, too.
    this->moveTreeViewItem(draggedItem, targetItem);

    // finish drag-and-drop operation
    ::ImageList_EndDrag();
    ::ImageList_Destroy(draggedImageList);
    ::ReleaseCapture();
    ::ShowCursor(true);

    // clear global variables
    draggedItem = 0;
    draggedImageList = 0;
    itemDragged = false;
}
Pop-up Menu
It is nice to have a popup menu to do some actions when a item is clicked with the right mouse button. To receive the right mouse button event on the TreeView, use WM_CONTEXTMENU. WPARAM of WM_CONTEXTMENU holds the handle to the window where the right mouse button event occurs, and LPARAM of WM_CONTEXTMENU contains the cursor position in screen coordinates. The following code shows a popup menu to add new item or to delete the right-clicked item.
- Get HWND of TreeView and the cursor position in WM_CONTEXTMENU event.
- Convert the cursor position from screen coords to client coords.
- Get HTREEITEM of the item at the cursor position with TVM_HITTEST.
- Load a menu using LoadMenu().
- Show the menu using TrackPopupMenu() with TPM_RETURNCMD flag.
- Handle the menu command returned by TrackPopupMenu().
- Delete the menu using DestroyMenu().
// convert the cursor position to client coords
POINT point;
point.x = (SHORT)x;
point.y = (SHORT)y;
::ScreenToClient(tvHandle, &point);

// find out the item under the cursor
TVHITTESTINFO hitTestInfo;
hitTestInfo.pt.x = point.x;
hitTestInfo.pt.y = point.y;
HTREEITEM item = (HTREEITEM)::SendMessage(tvHandle,
                                          TVM_HITTEST,
                                          (WPARAM)0,
                                          (LPARAM)hitTestInfo);;

// load popup menu
HMENU menu = ::LoadMenu(::GetModuleHandle(0), MAKEINTRESOURCE(IDR_MENU));
HMENU subMenu = ::GetSubMenu(menu, 0);
int command = ::TrackPopupMenu(subMenu, TPM_RETURNCMD, x, y, 0,
                               parentHandle, 0);

// handle menu commands
if(command == ID_TREEVIEW_ADDITEM)
{
    // add new item
}
else if(command == ID_TREEVIEW_REMOVEITEM)
{
    // delete the selected item
}

::DestroyMenu(menu);
Example
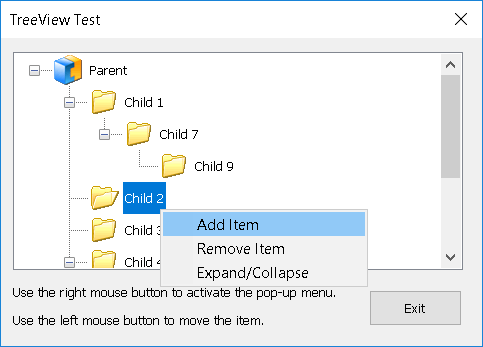
This application is to test a TreeView control. Use the left mouse button to drag and drop an item, and use the right mouse button to add or remove an item from the TreeView. This program uses only Windows API, but no MFC nor .NET. I implemented own GUI framework using MVC (Model-View-Controller) paradigm. Other frequently used controls, such as Button and TextBox, are defined in Controls.h.
Download the source and binary: TreeView.zip
(Updated: 2019-01-23, included 64-bit VisualStudio 2015 project)