OpenGL Windows GUI Application
This article is about a MVC (Model-View-Controller) framework to create OpenGL GUI applications using native Win32 API on Windows platform. MVC architecture is a common design framework for GUI applications, and is used in many GUI libraries, such as .NET, MFC, Qt, JavaFX, etc. The major benefits of this MVC framework with OpenGL are the complete separation of system-independent OpenGL calls from Windows system and the universal message router for multiple windows.
Download: glWinSimple.zip, glWin.zip, OrbitCamera.zip, ObjViewer.zip
- Overview
- Example 1: glWinSimple
- Create OpenGL window
- Separate thread for rendering OpenGL
- Example 2: glWin
- Message router
- More about Controller class
- Example 3: Multiple OpenGL Windows
- Window dimension and high DPI display
- Keyboard/Mouse Event Hook
Overview
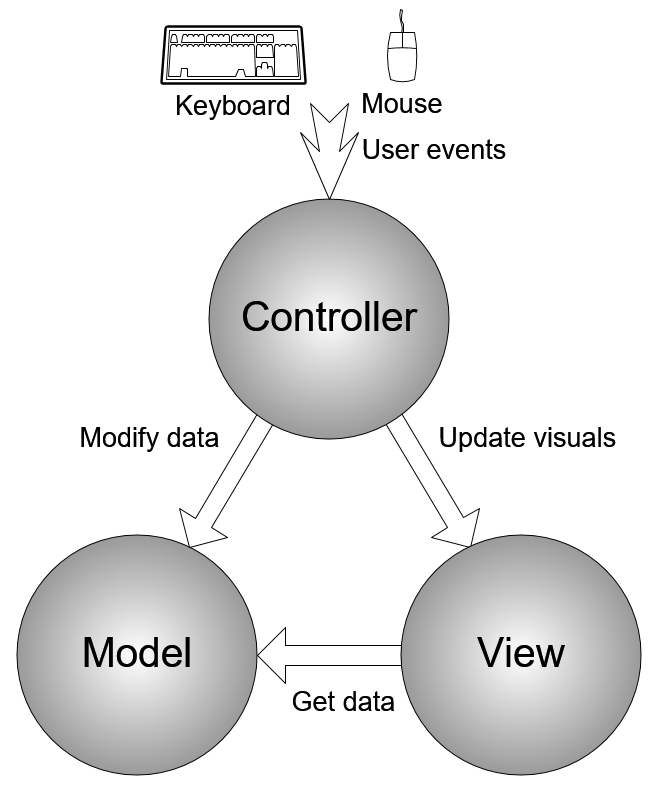
MVC paradigm is to divide an application into 3 separate components; Model, View and Controller components in order to minimize dependencies between them.
Model component is the brain part of the application, which contains all application data and implementations to tell how the application behaves. More importantly, Model component does not have any reference to View or Controller component, which means Model component is purely independent. It does not know which Controller or View component is associated with. Model component simply processes the requests from any Controller or View component.
View component is responsible to render the visual contents onto the screen. Also, View module does not have any reference to Controller component (independent on Controller). It only performs rendering process when any Controller component requests to update the visual. However, View component should reference to a certain Model component, because it must know where to obtain the data from, so, it can render the data on the screen.
Controller component is the bridge between users and the application by receiving and handling all user events, such as keyboard and mouse inputs. This module should know which Model and View component to access. In order to handle a user event, Controller component requests Model to process the new data, and at the same time, tells View component to update the visuals.
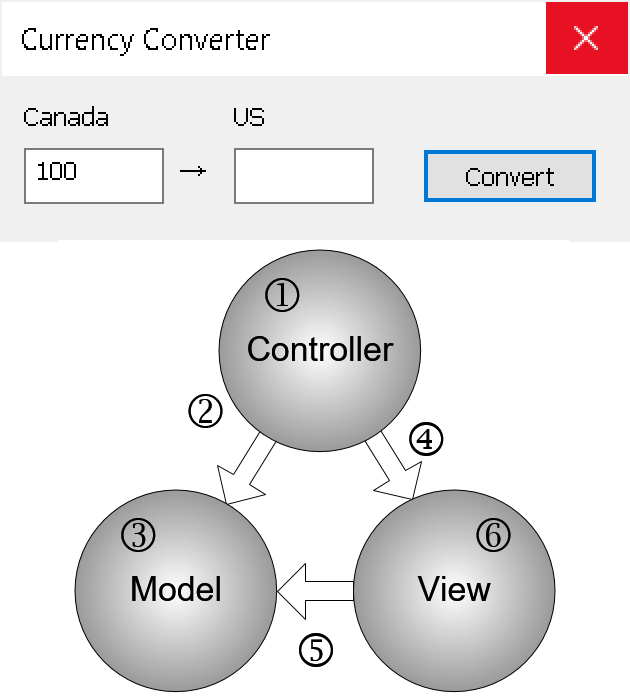
Here is a very simple scenario. Imagine that you make a currency conversion program from Canadian dollars to US dollars. When a user click "Convert" button, what should your application do?
- Controller gets the button click event first.
- Controller sends the input value to Model and requests the conversion.
- Model converts the input to US dollars and save the result.
- Controller requests View to display the result.
- View gets the result from Model.
- View displays the result on the screen.
The major advantages of MVC design are clarity and modularity. Since MVC paradigm cleanly separates an application into 3 logical components, it is cleaner and easier to understand the role of each component, and to maintain each module separately by multiple developers. Because of its efficient modularity, the components can be interchangeable and scalable. For example, you can customize the look-and-feel of View component without modifying Model and Controller modules, or can add multiple different views (table and chart) simultaneously.
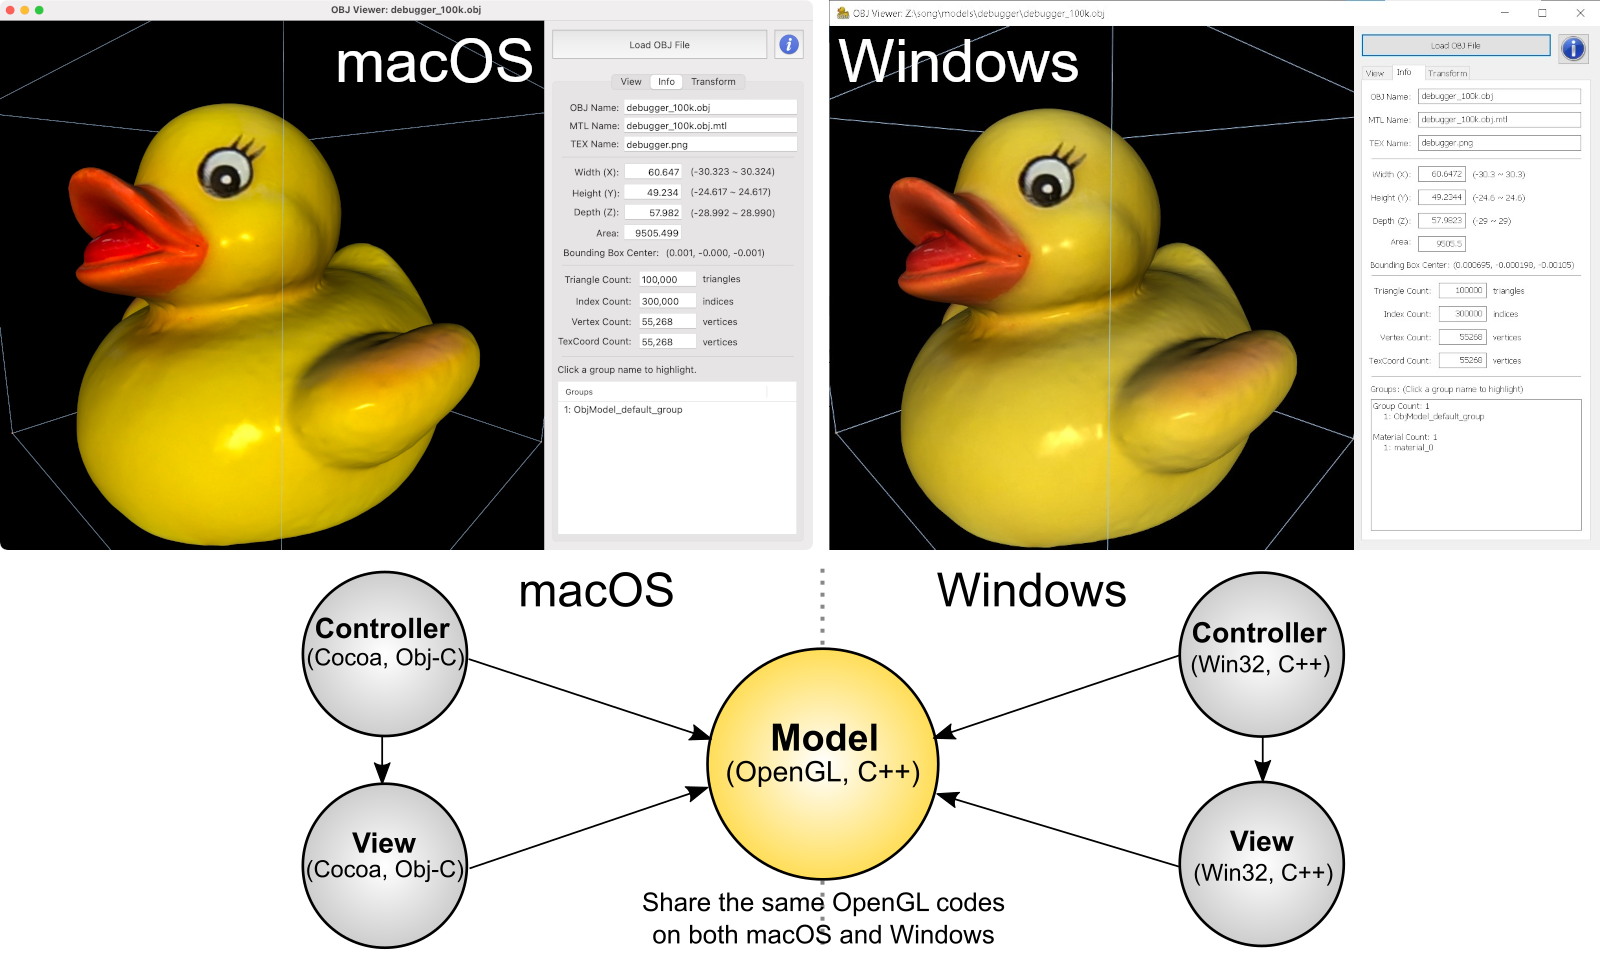
The other advantage is reusability of Model component for cross-platform development. If Model component contains only OpenGL-specific codes and it is a platform independent, Model can be shareable on the multiple platforms without modifying itself at all. Then, you only implement View and Controller components using native platform-specific frameworks/APIs, such as Cocoa for macOS and Win32 for Windows.
Here is an example of cross-platform OpenGL application to loading OBJ files with MVC paradigm. Model components of both systems are identical and contain only OpenGL codes.
![]() ObjViewer.zip (includes VisualStudio project, updated 2025-12-07)
ObjViewer.zip (includes VisualStudio project, updated 2025-12-07)
![]() ObjViewer_mac.zip (includes Xcode project, updated 2025-12-07)
ObjViewer_mac.zip (includes Xcode project, updated 2025-12-07)
Example 1: glWinSimple
This is a single window OpenGL application. It does not have GUI controls except mouse interaction. However, this example is better to understand how to implement the MVC design to an OpenGL application. Then, we will discuss with more complex example in the following section.
Get the source and binary (64 bit) file from: glWinSimple.zip
(Updated: 2025-09-09, included VisualStudio 2022 project)
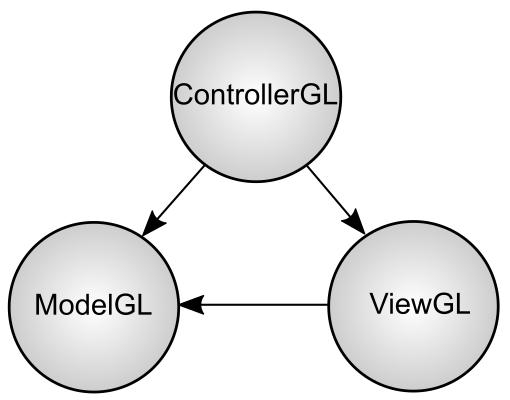
This application consists of 3 separate C++ classes, ModelGL, ViewGL and ControllerGL. For OpenGL application, all system-independent OpenGL commands can be placed in the ModelGL component, so, Model component itself can be re-usable for other platforms such as macOS without any modification. Therefore, Model is purely independent on Controller and View modules.
View component is for rendering the visual onto screen with Win32 API. Therefore, all display device properties (rendering context, colour bits, etc) go into this component. Also, system-specific OpenGL commands are placed in this component, such as wglCreateContext() and wglMakeCurrent(). Again, View component does not reference to Controller (independent on Controller), but may need to reference to Model, for instance, to get Model's data to update View contents.
Controller component is for receiving all user events first using Win32 API, then, updates Model's states, and notifies to View component to render the scene. It has the basic input handling functions for keyboard (escape key) and mouse left/right buttons. Please look at the the source code in ControllerGL class; keyDown(), lButtonDown(), rButtonDown(), mouseMove(), etc. ControllerGL class is derived from the base class of Controller.cpp. You can simply add event handlers into ControllerGL class if you need to override the default behaviors.
These 3 objects are created in main(), and then, a single window is created with the reference (pointer) to the ControllerGL object. I used a helper class, Window.cpp to create a window. Notice that the main function remains very simple, and all detailed implementations are moved to 3 separate components; ModelGL, ViewGL and ControllerGL.
int WINAPI WinMain(...)
{
    // instantiate Model and View, so Controller can reference them
    ModelGL model;
    Win::ViewGL view;   // under "Win" namespace because of Windows specific

    // create ControllerGL with ModelGL and ViewGL pointers
    Win::ControllerGL glCtrl(&model, &view);

    // create a window with given Controller
    Win::Window glWin(hInst, L"glWinSimple", 0, &glCtrl);
    glWin.setWindowStyle(WS_OVERLAPPEDWINDOW | WS_VISIBLE |
                         WS_CLIPSIBLINGS | WS_CLIPCHILDREN);
    glWin.setClassStyle(CS_OWNDC);
    glWin.setWidth(400);
    glWin.setHeight(300);

    glWin.create();
    glWin.show();

    // enter main message loop //////////////////////////////////
    int exitCode;
    exitCode = mainMessageLoop();

    return exitCode;
}
Create OpenGL window
Creating an OpenGL window with Win32 API is same as creating other generic windows except OpenGL rendering context (RC). The OpenGL rendering context is a port to link OpenGL to Windows system. All OpenGL commands can pass through this rendering context. The rendering context must be associated with a device context (DC) which has same pixel format as RC has, so, OpenGL drawing can take place on the device surface.
In your WM_CREATE handler, you can create a RC:
- Get the DC of the OpenGL window with GetDC() and the window handle.
- Set the desired pixel format with SetPixelFormat() and the DC.
- Create new RC with wglCreateContext() and the DC.
- Release the DC with ReleaseDC().
In your WM_CLOSE handler, you can delete the RC:
- Release the current RC with wglMakeCurrent() and NULL parameter.
- Delete the RC with wglDeleteContext().
In your rendering loop, set the rendering context as the current RC with wglMakeCurrent() before calling any OpenGL commands. I use a separate worker thread for the rendering loop. Plese see the following section, "Separate thread for rendering OpenGL".
Finding a desired pixel format can be done by searching all available formats using DescribePixelFormat(). A standard scoring mechanism to find the best pixel format is described in findPixelFormat() method in ViewGL class.
// find the best pixel format
int findPixelFormat(HDC hdc, int colorBits, int depthBits, int stencilBits)
{
    int currMode;                   // pixel format mode ID
    int bestMode;                   // return value, best pixel format
    int currScore;                  // points of current mode
    int bestScore;                  // points of best candidate
    PIXELFORMATDESCRIPTOR pfd;

    // search the available formats for the best mode
    bestMode = 0;
    bestScore = 0;
    for(currMode = 1;
        ::DescribePixelFormat(hdc, currMode, sizeof(pfd), &pfd) > 0;
        ++currMode)
    {
        // ignore if cannot support opengl
        if(!(pfd.dwFlags & PFD_SUPPORT_OPENGL))
            continue;

        // ignore if cannot render into a window
        if(!(pfd.dwFlags & PFD_DRAW_TO_WINDOW))
            continue;

        // ignore if cannot support rgba mode
        if((pfd.iPixelType != PFD_TYPE_RGBA) ||
           (pfd.dwFlags & PFD_NEED_PALETTE))
            continue;

        // ignore if not double buffer
        if(!(pfd.dwFlags & PFD_DOUBLEBUFFER))
            continue;

        // try to find best candidate
        currScore = 0;

        // colour bits
        if(pfd.cColorBits >= colorBits) ++currScore;
        if(pfd.cColorBits == colorBits) ++currScore;

        // depth bits
        if(pfd.cDepthBits >= depthBits) ++currScore;
        if(pfd.cDepthBits == depthBits) ++currScore;

        // stencil bits
        if(pfd.cStencilBits >= stencilBits) ++currScore;
        if(pfd.cStencilBits == stencilBits) ++currScore;

        // alpha bits
        if(pfd.cAlphaBits > 0) ++currScore;

        // check if it is best mode so far
        if(currScore > bestScore)
        {
            bestScore = currScore;
            bestMode = currMode;
        }
    }

    return bestMode;
}
Separate thread for rendering OpenGL
MS Windows is an event-driven system. An event driven windows application will rest/idle without doing anything if there is no event triggered. However, OpenGL rendering window may need to be constantly updated even if no event coming to the application. One of solutions for constant updating OpenGL window is using PeekMessage() in the window message loop.
int mainMessageLoop()
{
    MSG msg;

    while(1)
    {
        if(::PeekMessage(&msg, 0, 0, 0, PM_REMOVE))
        {
            if(msg.message == WM_QUIT)
            {
                break;
            }
            else
            {
                ::TranslateMessage(&msg);
                ::DispatchMessage(&msg);
            }
        }
        else
        {
            // NOTE: it shouldn't be here
            // because this message loop should handle window messages only.
            render();
        }
    }
    return (int)msg.wParam;
}
However, there is a better solution using a separate worker thread for OpenGL rendering. The advantage of multithread is that you can leave the message loop to do its own job, handling only the windows events, and the separate worker thread will handle rendering OpenGL scene independently. Also, we do not need to expose any OpenGL rendering method in this message loop. So, the main message loop can remain as simple as possible.
int mainMessageLoop()
{
    MSG msg;

    // loop until WM_QUIT(0) received
    while(::GetMessage(&msg, 0, 0, 0) > 0)
    {
        ::TranslateMessage(&msg);
        ::DispatchMessage(&msg);
    }

    return (int)msg.wParam;
}
When the window is created (WM_CREATE event triggered), the ControllerGL object will initialize ModelGL and ViewGL object, then, start a separate worker thread for OpenGL rendering. std::thread C++ class object is used to create a worker thread. Please check ControllerGL::create() and ControllerGL::runThread() for more details.
// handle WM_CREATE
int ControllerGL::create()
{
    ....
    // create a thread for OpenGL rendering
    glThread = std::thread(&ControllerGL::runThread, this);
    loopFlag = true;
    return 0;
}

// rendering loop
void ControllerGL::runThread()
{
    // set the current RC in this thread
    ::wglMakeCurrent(viewGL->getDC(), viewGL->getRC());

    // initialize OpenGL states
    modelGL->init();

    // rendering loop
    while(loopFlag)
    {
        std::chrono::milliseconds ms(1);     // duration in ms
        std::this_thread::sleep_for(ms);     // yield to other processes or threads

        modelGL->draw();
        viewGL->swapBuffers();
    }

    // terminate rendering thread
    ::wglMakeCurrent(0, 0);                  // unset RC
    ::wglDeleteContext(viewGL->getRC());     // delete RC
}
Example 2: glWin
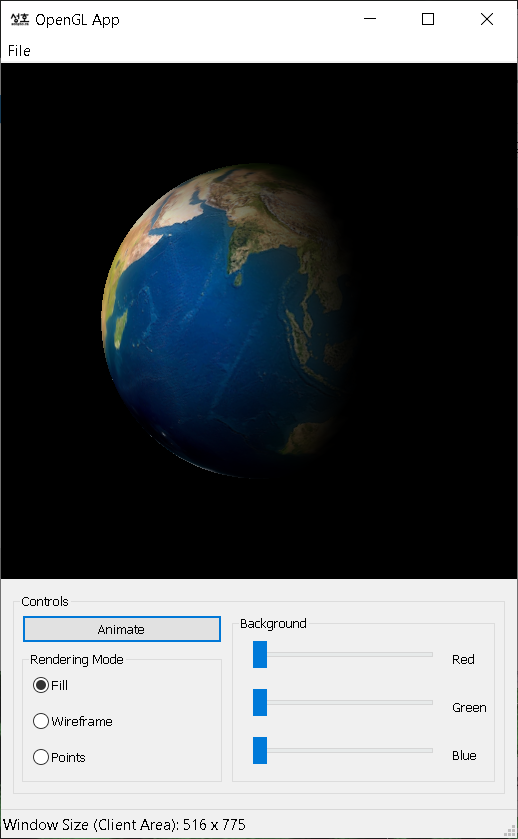
This example has 3 windows; the OpenGL rendering child window, the other child dialog window containing all UI controls, and finally, the main window enclosing these 2 child windows. (There are menu bar and status bar in the main window. They are also sub windows, but we don't count on them as children in this article.)
Download the source and 64 bit binary from: glWin.zip
(Updated: 2025-11-08, included VisualStudio 2022 project)
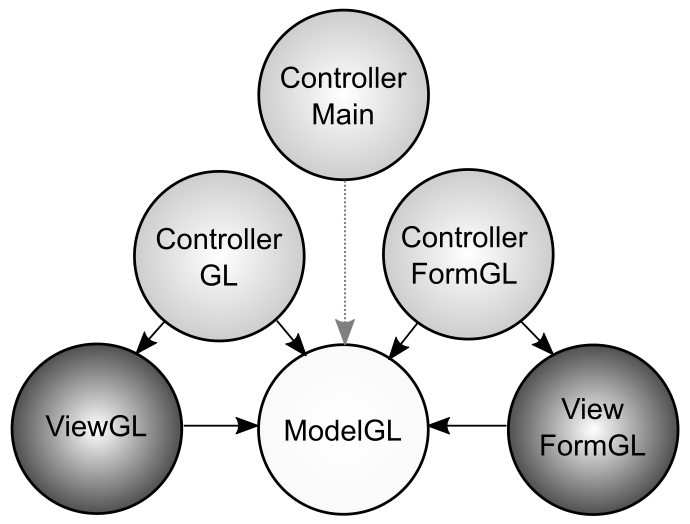
Since there are 3 windows, 3 Controller objects are required for this application, 1 Controller per each window: ControllerMain, ControllerGL and ControllerFormGL. And, 2 View components, ViewGL and ViewFormGL are required; one for OpenGL rendering, and for the dialog child window. Because the main window is simply a container, it does not have a View component. Notice that there is only one Model object necessary, and it is referenced by all 3 Controllers and 2 Views.
ViewFormGL is a dialog (or form) window containing UI controls (buttons, text box, etc). Therefore, all controls are defined in ViewFormGL class. I implemented the classes for the commonly used controls, and they are declared in "Controls.h" file. The currently supported controls are Button, RadioButton, CheckBox, TextBox, EditBox, ListBox, ListView, Trackbar, ComboBox, TreeView, UpDownBox, SysLink, Picture and Tab.
Here is a scenario what is happening when a user clicks "Animate" button:
- ControllerFormGL gets BN_CLICKED event first.
- ControllerFormGL sets the animation flag true in ModelGL, so the earth can spin.
- ControllerFormGL tells ViewFormGL to change the caption of the button to "Stop".
Message Router
A windows application must provide a pointer to a callback function (window procedure) when you create a window, more precisely when you register a window class (with RegisterClass() or RegisterClassEx()). When an event is triggered in your program, for example, the user clicks a button control, Windows system sends a message to your program, and the event message is passed to the window procedure that you specified.
In general, the window procedure looks like this:
LRESULT CALLBACK windowProcedure(HWND hWnd, UINT msg, WPARAM wParam, LPARAM lParam)
{
    switch(msg)
    {
    case WM_COMMAND:
        ...
        break;

    case WM_CREATE:
        ...
        break;

    // more messages
    ...

    default:
        return ::DefWindowProc(hWnd, msg, wParam, lParam);
    }

    return 0;
}
The other benefit of this MVC framework is the dynamic message routing, which distributes the messages to the Controller associated with the window handle. So, we can create one window procedure once and reuse it multiple times for all windows that you create. This technique is inspired by Windows API tutorials from Reliable Software. The basic idea is passing the pointer to the Controller object in lpParam of CreateWindow() or CreateWindowEx() when you create a window. When WM_NCCREATE message is called, we extract the pointer value from lpCreateParams and store it as the window's GWLP_USERDATA attribute. Later, other message is triggered, we simply look up the GWLP_USERDATA of a window to find out which controller is associated with the window. Since this window procedure will be used for all windows you create, you don't have to worry about rewriting another window procedure any more.
The actual message router looks like this:
LRESULT CALLBACK windowProcedure(HWND hwnd, UINT msg, WPARAM wParam, LPARAM lParam)
{
    LRESULT returnValue = 0;    // return value

    // find controller associated with window handle
    static Win::Controller *ctrl;
    ctrl = (Controller*)::GetWindowLongPtr(hwnd, GWLP_USERDATA);

    if(msg == WM_NCCREATE)      // Non-Client Create
    {
        // WM_NCCREATE message is called before non-client parts(border,
        // titlebar, menu, etc) are created. This message comes with a pointer
        // to CREATESTRUCT in lParam. The lpCreateParams member of CREATESTRUCT
        // actually contains the value of lpPraram of CreateWindowEX().
        // First, retrieve the pointrer to the controller specified when
        // Win::Window is setup.
        ctrl = (Controller*)(((CREATESTRUCT*)lParam)->lpCreateParams);
        ctrl->setHandle(hwnd);

        // Second, store the pointer to the Controller into GWLP_USERDATA,
        // so, other messege can be routed to the associated Controller.
        ::SetWindowLongPtr(hwnd, GWLP_USERDATA, (LONG_PTR)ctrl);

        return ::DefWindowProc(hwnd, msg, wParam, lParam);
    }

    // check NULL pointer, because GWLP_USERDATA is initially 0, and
    // we store a valid pointer value when WM_NCCREATE is called.
    if(!ctrl)
        return ::DefWindowProc(hwnd, msg, wParam, lParam);

    // route messages to the associated controller
    switch(msg)
    {
    case WM_CREATE:
        returnValue = ctrl->create();
        break;

    // more messages
    ...

    default:
        returnValue = ::DefWindowProc(hwnd, msg, wParam, lParam);
    }

    return returnValue;
}
And, you create 3 windows like the following in the main function. Notice that we provide the pointer to Controller object when we initialize the parameters of a window. This pointer value will be stored in GWLP_USERDATA of each window, then, the message router will dynamically distribute the window events to the given Controller object.
// create the main window with the ptr to mainCtrl
Win::ControllerMain mainCtrl;
Win::Window mainWin(hInst, "glWinApp", 0, &mainCtrl);
mainWin.create();

// create the OpenGL rendering window with the ptr to glCtrl
Win::ControllerGL glCtrl(&modelGL, &viewGL);
Win::Window glWin(hInst, L"WindowGL", mainWin.getHandle(), &glCtrl);
glWin.create();

// create the dialog window containing controls with the ptr to formCtrl
Win::ControllerFormGL formCtrl(&modelGL, &viewFormGL);
Win::DialogWindow glDialog(hInst, IDD_FORMVIEW, mainWin.getHandle(), &formCtrl);
glDialog.create();
There is a small difference for the dialog window procedure. We store the pointer of the Controller to GWLP_USERDATA when WM_INITDIALOG message is called, instead of WM_NCCREATE. Please check procedure.cpp for more details.
More about Controller class
This MVC framework provides a base Controller class with default event handlers. Indeed, it does nothing and simply returns 0. To do some meaningful tasks when a message comes, you need to create a class derived from this base class, and override (rewrite) the virtual functions in your subclass. The names of the virtual functions in Controller base class are same as message IDs without prefix, for example, lButtonDown() for WM_LBUTTONDOWN message.
For the above glWin program, ControllerMain, ControllerGL, and ControllerFormGL are derived from the Controller base class.
ControllerMain is responsible to handle WM_CLOSE message to quit the program when the user click close button or select "Exit" from main menu.
ControllerGL simply handles mouse interactions for the camera manipulations (zoom and rotate the camera). And, it creates a worker thread for OpenGL renderer when WM_CREATE message is arrived.
ControllerFormGL manages all UI control interfaces.
Example 3: Multiple OpenGL Windows
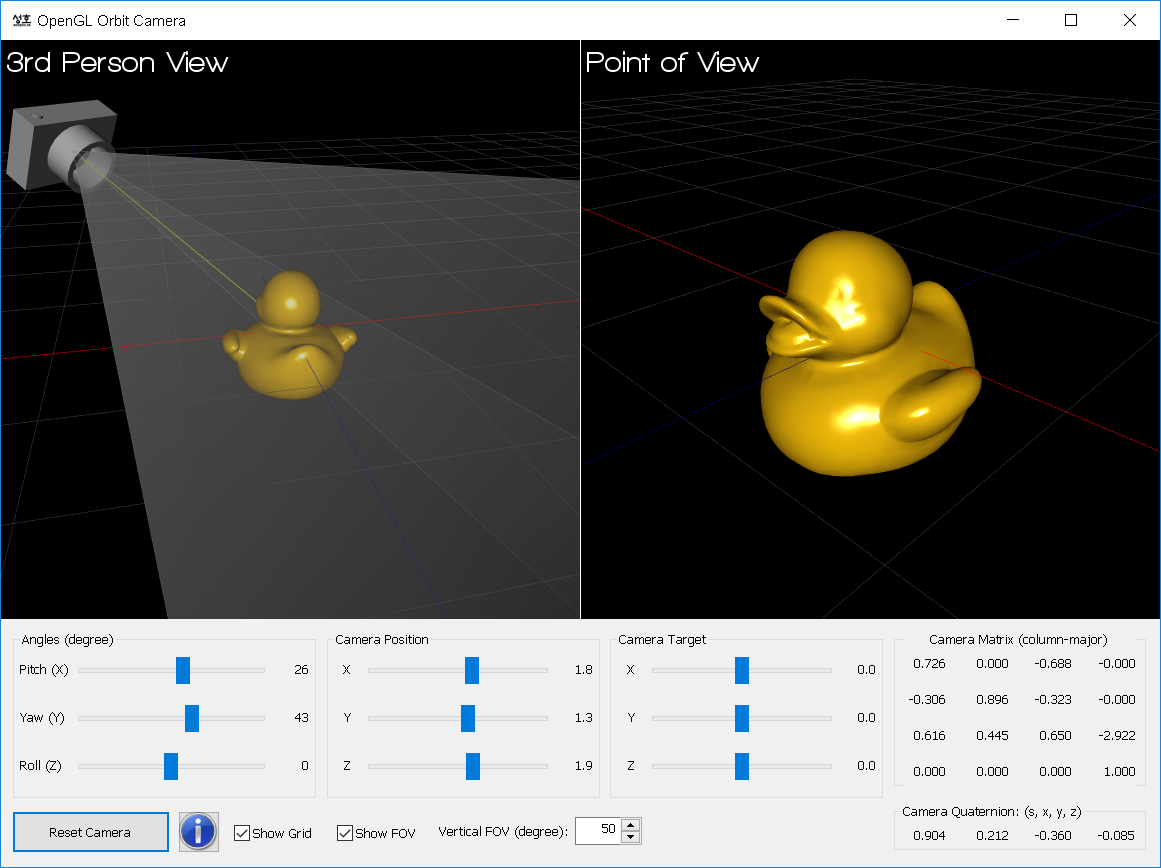
It is possible to have multiple OpenGL windows in one application. The following example contains 2 OpenGL sub-windows to render the scene from 2 different points of views.
Get the source and binary (64 bit) file from: OrbitCamera.zip
(Updated: 2025-11-20, included VisualStudio 2022 project)
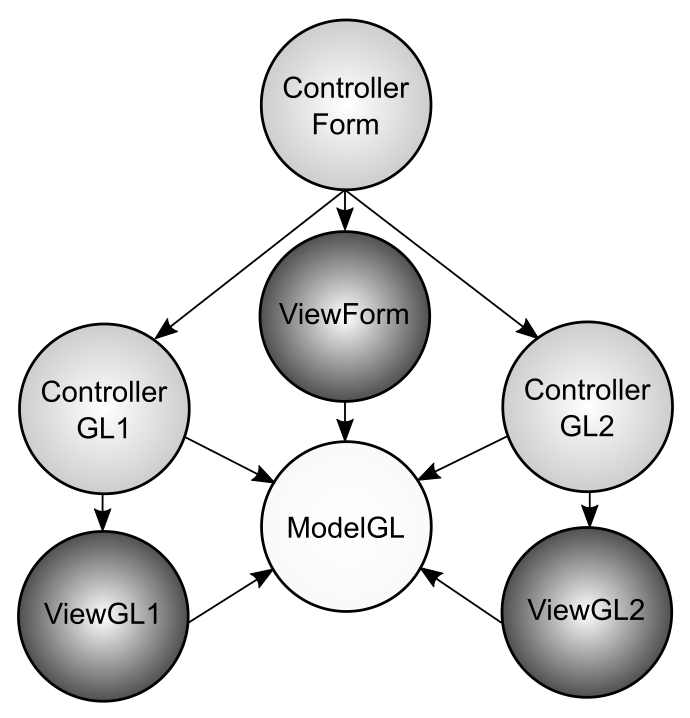
It consists of 2 controllers/views for each OpenGL window, plus an additional ControllerForm/ViewForm pair for the dialog of the controls (buttons, trackbars, etc.). However all 3 controller/view pairs are still referencing single model component, ModelGL to update OpenGL scene.
Since both OpenGL windows render the same scene. there is only one OpenGL redering context (RC) was created, and it is shared on both windows. Therefore, ControllerGL1 and ControllerGL2 have slightly different implementations; ControllerGL1 creates the device context (DC) and OpenGL RC together, but, ControllerGL2 creates only new device context for itself and shares the OpenGL RC that is already created by ControllerGL1.
This application does not use a separate thread to render OpenGL automatically. Instead, ControllerForm keeps the references to ControllerGL1 and ControllerGL2. And, whenever a user event is triggered, it invokes paint() functions of both controllers.
Note that DC of the second window must have same pixel formats as the first window DC in order to share same OpenGL RC. At drawing time, you simply switch DCs using wglMakeCurrent() calls.
// draw to window 1 by ctrlGL1->paint()
::wglMakeCurrent(hdc1, hglrc);
modelGL->draw(1);
viewGL1->swapBuffers();

// draw to window 2 by ctrlGL2->paint()
::wglMakeCurrent(hdc2, hglrc);
modelGL->draw(2);
viewGL2->swapBuffers();
You may create multiple OpenGL rendering contexts (RCs), and share OpenGL objects among multiple RCs, for example, a texture object created in the first RC can be used in the second RC. Because multiple RCs may run asynchronously with multiple threads and windows, you have to synchronize OpenGL rendering pipeline properly with GL_ARB_sync extension (blocks further OpenGL calls until the current command is completed).
For camera implementaion in OpenGL, please read OpenGL Camera page.
Window Dimension and High DPI Display
When you create a window by calling CreateWindowEx() or CreateWindow() Win32 API, you need to provide the width and height of the window. Note that this size will also include non-client areas, such as title bar, menu, border and even, non-visible border around the window. If you want to have an exact client area, for example 512x512 rendering area, then you must adjust the window size after the window is created (but before it is shown).
First, calculate the total required window size for the desired client rectangle area with AdjustWindowRect() or AdjustWindowRectEx(). It returns new window dimension including the desired client area plus non-client area, such as title bar, border, etc. Then, call SetWindowPos() with the new window size in order to resize the window.
The following example is to make a 512x512 OpenGL rendering area.
// AdjustWindowRectEx() requires GWL_STYLE, GWL_EXSTYLE of window
DWORD style   = (DWORD)::GetWindowLongPtr(glWin.getHandle(), GWL_STYLE);
DWORD styleEx = (DWORD)::GetWindowLongPtr(glWin.getHandle(), GWL_EXSTYLE);

// define 512x512 client-only rectangle
RECT rect;
rect.left   = 0;
rect.right  = 512;
rect.top    = 0;
rect.bottom = 512;

// re-calculate new window size including non-client area
// it returns new bigger rectangle with non-client area
::AdjustWindowRectEx(&rect, style, FALSE, styleEx);

// re-size window with the new rectangle
int width  = rect.right-rect.left;
int height = rect.bottom-rect.top;
::SetWindowPos(glWin.getHandle(), 0, 0, 0, width, height, SWP_NOZORDER);
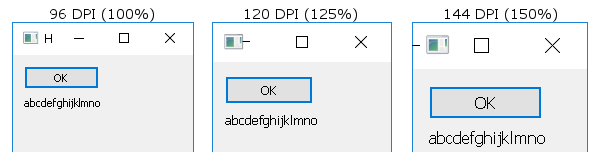
Modern displays provide high DPI (dots per inch) density, and Windows OS supports high DPI settings for optimal viewing experience. With high-DPI settings, all GUI elements, text, icons and window layout will be automatically scaled up, corresponding to the system's DPI setting.
If an application is not aware of high DPI display settings, it will appear blurry or truncated on screen. In order to fix this, you need to build the application with <dpiAware> for Windows 7 and 8, and <dpiAwareness> attribute for Windows 10 & 11 in the application's manifest file. Please see glWin.exe.manifest file in glWin application for detail.
// Example of glWin.exe.manifest file
<?xml version="1.0" encoding="UTF-8" standalone="yes"?>
<assembly manifestVersion="1.0"
          xmlns="urn:schemas-microsoft-com:asm.v1"
          xmlns:asmv3="urn:schemas-microsoft-com:asm.v3">
...

<asmv3:application>
<asmv3:windowsSettings>

<!-- for Windows 7 and 8 -->
<dpiAware xmlns="http://schemas.microsoft.com/SMI/2005/WindowsSettings">
    true/pm
</dpiAware>

<!-- for Windows 10 and 11 -->
<dpiAwareness xmlns="http://schemas.microsoft.com/SMI/2016/WindowsSettings">
    PerMonitorV2, PerMonitor
</dpiAwareness>

</asmv3:windowsSettings>
</asmv3:application>
</assembly>
Keyboard/Mouse Event Hook
If a parent window is covered by its child window, the parent window cannot receive the keyboard and mouse events, and all events go to the child window instead. Also, a dialog window created by CreateDialog() or CreateDialogParam() Win32 API does not receive keyboard nor mouse events by design.
One way to receive the keyboard and mouse events from a parent window or dialog is registering the event hooks to the window/dialog to capture low-level events from the Windows system directly using SetWindowsHookEx() and callback procedures. And, it must be released by calling UnhookWindowsHookEx() when the event tracking is done.
Here is an example of monitoring low-level keyboard and mouse events using SetWindowsHookEx(), and a code snippet below. Please see the detail implementaion in ControllerMain.cpp.
Download: TestHook.zip (includes VS 2022 project)
// install low-level keyboard/mouse event hooks
HINSTANCE instance = ::GetModuleHandle(0);
hookKeyboard = ::SetWindowsHookEx(WH_KEYBOARD_LL, keyboardProcedure, instance, 0);
hookMouse = ::SetWindowsHookEx(WH_MOUSE_LL, mouseProcedure, instance, 0);
...

// hook for keyboard events
LRESULT CALLBACK keyboardProcedure(int code, WPARAM wParam, LPARAM lParam)
{
    // do not process if code < 0
    if(code >= 0)
    {
        // wParam contains keyboard event name
        // lParam contains ptr to KBDLLHOOKSTRUCT
        KBDLLHOOKSTRUCT* khs = (KBDLLHOOKSTRUCT*)lParam;

        switch(wParam)
        {
        case WM_KEYDOWN:
            view.updateKeyDown(khs->vkCode);   // pass virtual key code
            break;

        case WM_KEYUP:
            view.updateKeyUp(khs->vkCode);     // pass virtual key code
            break;
        }
    }

    // chain to the next hook procedures
    return ::CallNextHookEx(hookKeyboard, code, wParam, lParam);
}

// hook for mouse events
LRESULT CALLBACK mouseProcedure(int code, WPARAM wParam, LPARAM lParam)
{
    // do not process if code < 0
    if(code >= 0)
    {
        // wParam contains mouse event name
        // lParam contains ptr to MSLLHOOKSTRUCT
        MSLLHOOKSTRUCT* mhs = (MSLLHOOKSTRUCT*)lParam;

        switch(wParam)
        {
        case WM_LBUTTONDOWN:
            view.updateMouseDown(1);   // pass left mouse down
            break;

        case WM_LBUTTONUP:
            view.updateMouseUp(1);
            break;

        case WM_MOUSEWHEEL:
            // pass wheel delta
            view.updateMouseWheel(GET_WHEEL_DELTA_WPARAM(mhs->mouseData));
            break;

        case WM_MOUSEMOVE:
            // pass mouse position (x,y) in screen space
            view.updateMousePosition(mhs->pt.x,  mhs->pt.y);
            break;
        }
    }

    // chain to the next hook procedures
    return ::CallNextHookEx(hookMouse, code, wParam, lParam);
}
...

// uninstall event hooks before closing the window
::UnhookWindowsHookEx(hookKeyboard);
::UnhookWindowsHookEx(hookMouse)
...